


Respon Moulding Co., Ltd
www.responmoulding.com

What's sink mark in plastic injection molding? and how to prevent sink marks?
Nov21,2022
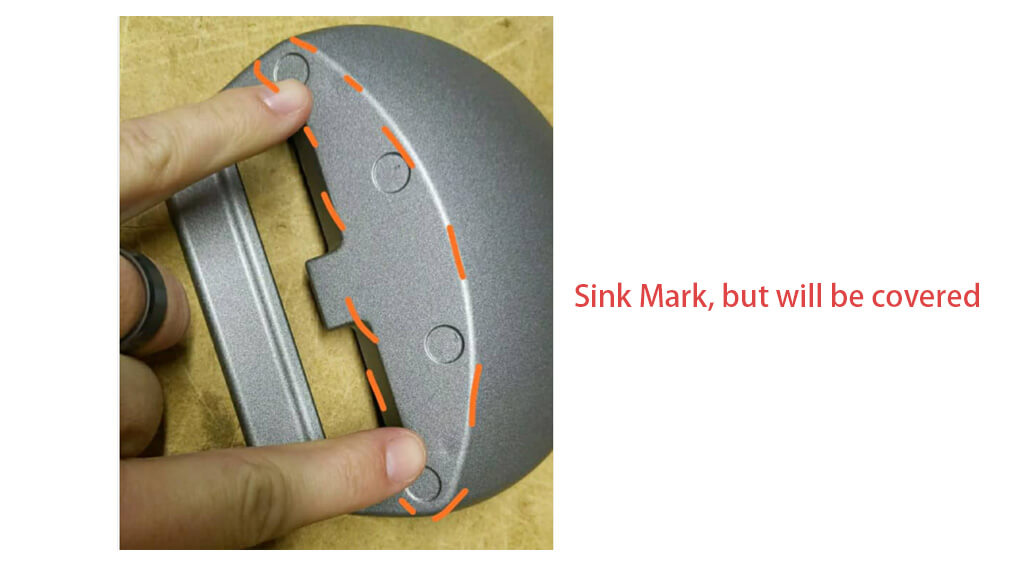
Sink mark is a defect looks more like a dimple or groove on the surface of injection molded parts with variations in wall thickness, typically found in a thicker area of a component. The degree of visibility of a sink is dependent on its depth, the color of the product, and its texture. Sink marks happen when areas of hot liquid resin cool and shrink at different rates. Sink marks can originate from processing methods, tooling design, part geometry, and material selection. Most often, sinks don’t affect structural integrity or strength. Look at where the sink is. If the sink appears in a hidden place or will be covered by another part, and if it doesn’t impact the structural integrity or strength, then you can just leave it there. Labels also use for covering a sink mark. A texture is also proving effective for hiding a sink mark. It can provide camouflage, but it can’t cover a sink mark. If, however, the sink shows up somewhere visible, you’ll need to take a hard look at what is causing it.
Cause 1: Incorrect Melt Temperature
Using an incorrect temperature when melting a resin could lead to sink mark on the surface of the finished plastic. Often, the sink marks are because of the low temperature of the insert, and if this is the case, increasing the temperature can resolve these issues. To avoid this, adjust the melting resin within the manufacturer’s recommended temperature range. Before injecting the resin into the mold, verify melt temperature.
Cause 2: Low Pack and Hold time
To avoid sink marks, hold it long enough to ensure the gate solidifies after filling the mold. This would help prevent melted material from exiting the mold, preventing sinks. In other words, where a mark or depression occurs near the gate, prolonging the pack and hold time helps eradicate it.
Cause 3: Improper Pack or Hold Pressure
To prevent sink marks or shrinkage, a typical mold cavity pressure ranges from 8000–15,000 psi. The rule to this is that the pack or hold pressure should be 50-70% of injection pressure. The best way to apply pressure is by gauging thickness. Consequently, thick mold sections require more plastic and pressure than less thick sections to maintain shape.
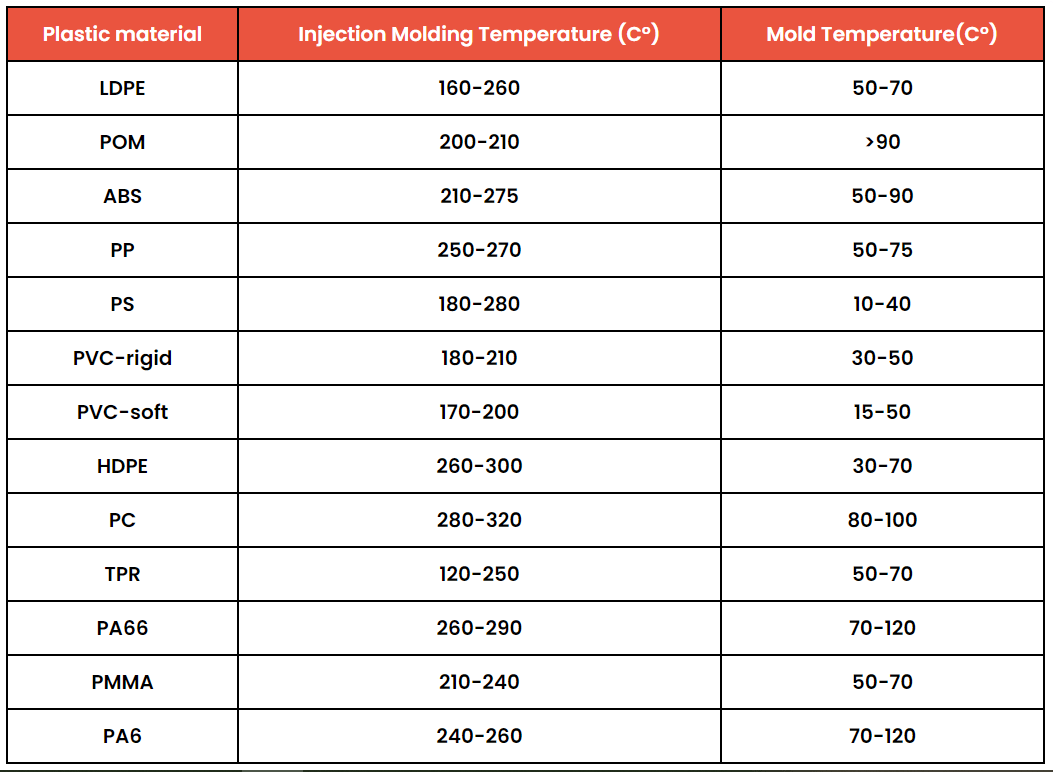
Cause 4: High Mold Temperature
Below is the recommended injection molding temperature for common plastic:
Cause 5: Improper Part Design
It is important to note that the ribs and bosses are the most common areas where sink marks occur. Below are a few ways to remedy injection molding defects caused by geometry.
Balance Rib And Wall Thickness
Creating a balance between rib and wall thickness would help reduce the tendency of these marks to form. Avoid increasing the height of the rib to the thickness of the wall. Also, do not make a rib height greater than 3x of the wall thickness.
Use a Gradual 7-Degree Slope at the Base of the Rib
It’s a good idea to use a gradual 7° slope at the base of any rib that you use in your design. Using this slope method only works when the gate is near the area. This slope helps ensure a gradual rise in the molten material injected into the mold, preventing blemishes and distortions on its surface.
Boss Design
When designing a boss where the hoop would go through minimal stress, the outside diameter should be double the inside diameter. This type of boss design would help reduce sink marks. On the other hand, if the boss hoop would go through a lot of stress if there is an application of heavier loads, the outside diameter should be two and half times the inner diameter.
The Thinner Base Area Around The Boss
It is best to avoid thinning the base area around the boss. This practice, which is common these days, makes the construction weak. As a result, the boss would require strong ribs for support which consequently interrupt the flow of material during injection, resulting in sink marks in the plastic.
Small Nozzle Hole
If the nozzle gets blocked or the nozzle hole of the molding machine is small, lack of pressure could cause a sink mark on the plastic. Hence, the best way to prevent this type of defect on plastic is by cleaning or replacing the injection machine nozzle to get the ideal injection speed.
Uniform wall thickness
In order to avoid sink marks, wall thickness should be uniform throughout in plastic design. This factor needs to be ensured in the initial design stage. If this factor is overlooked, it can result in a constrained process. Corners can be problem areas too, since the joining of two walls can lead to increased thickness. Rounding outer and inner corners can help maintain constant wall thickness and eliminate sink. If there is variation in wall thickness, the molten resin would first, flow freely through the thicker regions than the thinner sections. The wall thickness of the ribs should be no more than 50 to 80%.
Cause 6: Incorrect mold design
Moving the gate location: If the gate is sealed too early, sink marks can result. Relocating gates during design can change the timing of gate sealing, eliminating the sink marks.
One of the critical aspects of mold design in relation to sinks is water line placement. The thicker sections usually get adequate cooling at the part surface, however the inner portions of the thick area are often neglected. Getting water to inner portions of the thick section may be challenging but can improve sinks, part quality, and possibly cycle time. Remember, the goal is to provide uniform cooling to the area of the part where the sink occurs.
Cause 7: Wrong Plastic Material Selection
Material having more shrinkage is more prone to create a sink mark. The difference in the material proves effective for the improvement of sink marks. Many factors affect the materials selection, shrinking is one of the most important considerations. Try to use the materials with lower shrinkage rate, only when other conditions meet the needs.
As a manufacturing supplier, we suggest eliminating the sink mark on molded parts before it occurs, instead of looking for solutions in a rush when the sink mark appears. Looking for solutions means that the injection molded part design has to be modified, or engineers have to adjust the mold gates or runners. The measures mentioned not only increase the production cost but prolong the product development cycle. The worst thing is with all efforts have been made, you’ll have to make the compromise that sink marks are still there. 3D modeling provides a powerful capability for plastic part designing. In Solidworks, we can use thickness analysis for the assessment of our part. The plastic software makes possible feature modification and packing size. It will be helpful for the reduction of the sink mark.
<< Previous page
Next page >>
Web: www.responmoulding.com
Tel: +008613950149615 (Mob/Wechat/Whatsapp)
E-mail: sales@responmoulding.com
LINKS:


Copyright © Respon Moulding Co., Ltd . All rights reserved.
 +008613950149615 (Mob/Wechat/Whatsapp)
 sales@responmoulding.com
 +008613950149614
 929387114@qq.com
